Showing posts with label Recipe. Show all posts
Monday, September 26, 2011

Pumpkin Spice Bundt Cake and the Winner of the Give Thanks Pillow Cover


    Pin It

    Yesterday Lola and I made one of Jon's favorite autumn desserts. I can't remember the last time I baked something without my helper, Lillie, but she and Jon were on a little "date" at Inflation Nation, so Lola was my helper this time.  I wasn't patient enough and the cake was still hot when I put the glass dome on so it was quite foggy looking.


    I am not much of a cook so like pretty much anything I make, this was super easy! Here is the recipe:

    Pumpkin Spice Bundt Cake

    1 (18.5 oz) yellow cake mix
    1 (3.4 oz) package instant vanilla pudding mix
    1 (15 or 16 oz) can of pumpkin
    1/2 cup vegetable oil
    1/2 cup water
    3 eggs
    2 tsp. pumpkin pie spice (optional) *
    1/2 cup pecans (optional - we aren't big pecan fans so we don't use them)

    Heat oven to 325 degrees. Grease and flour either a 10 or 12 cup Bundt Pan.  In a large mixing bowl combine all ingredients except for pecans. Mix on medium speed for 2 minutes, then increase speed to medium/high for another three minutes. If you are adding nuts, stir them in. Spoon batter into prepared pan. Bake at 325 degrees for 45 to 55 minutes or until a toothpick inserted in center of cake comes out clean. Cool for ten minutes. (I always shake it when I pull it out of the oven first and then let it cool).  Remove from pan and let cool completely on rack. If desire drizzle with Spice Glaze.

    Spice Glaze

    2 cups sifted powdered sugar
    1 Tbsp. butter, softened
    1/2 tsp. pumpkin pie spice (optional) *
    2 to 4 Tbsp. milk

    In medium bowl, mix sugar, butter, and spice. Gradually add milk until desired consistency.

    * I think it is too strong if you add the pumpkin pie spice to both the cake AND the glaze. I recommend just adding it to one or the other. Personally, I like it best just in the cake and not in the icing.

    Drizzle over your cake and dig in!


    And now for the winner of our Give Thanks Pillow Cover:

     Congratulations! Send us an e-mail at dearlillie@hotmail.com with your shipping address and we will get it out in the mail for you.

    I hope you all have a wonderful Monday!


    Linking up to On the Menu Monday

Post Title

→

Pumpkin Spice Bundt Cake and the Winner of the Give Thanks Pillow Cover


Post URL

→

https://day-lab-diy.blogspot.com/2011/09/pumpkin-spice-bundt-cake-and-winner-of.html


Visit Animation Wallpaper Blogs for Daily Updated Wedding Dresses Collection
Friday, September 9, 2011

Easy Hot Fudge Sauce


    "Exercise is a dirty word...every time I hear it, I wash my mouth out with chocolate."
    - Charles Schulz


    Pin It

    I have been busy with our shop reopening, decorating for fall and doing several little projects that I will post about as well as planning a post on where in the world we keep Lillie's toys (yes, she does own some toys although they are seldom seen in photos) however I am having trouble getting any of these posts finished. It has been pouring here and therefore not good weather for taking photos and thanks to the thunderstorms the girls have not been napping or sleeping well. Hopefully the weekend will be nicer! Anyway, my lovely sister Jamie has been bribed into doing a post for me with a recipe for one of our favorite childhood desserts. (You can see her post with a delicious recipe for S'more Cookies here). If you are normally a skimmer (I must admit I am definitely a skimmer) I recommend actually reading her post because she is such a witty writer. Anyway, here she is:

    Running is dangerous. Every time I try to move faster than a jog, my heart starts beating irregularly and I feel faint as the temptation to dial 9-1-1 mounts. I do not recommend such exertion to anyone--except in emergencies, like when those catchy notes to "The Entertainer" can be heard from the next street over. Instead, I suggest at least one serving of chocolate a day. Now, I may not be able to outrun even the most sluggish of the animal kingdom, but if I meet my death by snapping turtle, at least I will be tasty.

    Here is the recipe for the fudge sauce that my mom made throughout our childhood, which has become a staple in my fridge, providing the perfect chocolate-y ending to every day:

    Moose's Creamy Hot Fudge Sauce
    1/2 cup of milk
    1/4 cup of butter
    1/4 tsp. of salt
    2 cups (one 11 1/2 oz. package) of Nestle Semi-Sweet Morsels
    1 tsp. of vanilla

    Melt milk, butter, and salt on low. Heat until butter melts. Add chocolate bits; stir until morsels melt and mixture is smooth. Remove from heat; stir in vanilla. Makes 1 1/2 cups of hot fudge sauce.

    *The original recipe called for Nestle's Milk Chocolate Morsels, but my mom has always made it with Semi-Sweet Chocolate, so I have never tried it with Milk Chocolate, but I'm sure it is delicious either way.
    **If you tend to be a lazy baker, and want to heat this on medium so it melts more quickly, think twice! If it heats too quickly it will taste burnt! (Not that this happens to me all the time or anything...:)


    Fact: there is no such thing as too much chocolate. Although my husband dares to disagree...In a battle that has lasted as long as our relationship, we clash on important issues such as favorite ice cream flavors, what constitutes a snack (blueberry yogurt?? I don't think so!), and whether or not chocolate is an essential part of one's daily diet. I have tried (and failed) to instill several life lessons in him, such as, but not limited to:
    1) Vanilla ice cream is chocolate ice cream MINUS THE FLAVOR
    2) The flavor that best compliments chocolate is more chocolate, not vanilla or strawberry.
    3) If it's not chocolate, it's not dessert.
    4) Anyone who does not think chocolate is the most exquisite flavor is missing essential taste bud DNA.
    To date, I have not had much success with my chocolate brainwashing. So, I have decided the best way to win him over is to simply prove it. I made strawberry shortcake from the easy recipe off the back of the Bisquick box--but he refused to drizzle hot fudge sauce over his. And after two years of living with my addiction, he still managed to be jaw-droppingly surprised by how much hot fudge sauce I poured over mine. Trust me, strawberry shortcake needs a touch--let's be honest, a ton--of chocolate to take it from mediocre to mouth-watering.

    Apparently, drizzling chocolate is another skill I can put in my "Will Never Learn" file.

    Enjoy! (p.s. Please excuse my hyperbole, I do believe you are still human even if you like vanilla!:)

    Also we have more of the Annistyn Scarves available again!
    The Winter White will go on sale at 9 this morning, 
    and the Black will go on sale at 9 tomorrow (Saturday) morning.


     And now we want to introduce another one of our sponsors:

     Chateau Maison Interiors is run by the lovely husband and wife team of Tyler and Ashley. Here is a bit about them from their website:
      
    Chateau Maison Interiors was founded in 2011 when I foundmyself wanting something more out of my career than getting a paycheck everytwo weeks. After re-evaluating my life, I realized that I wanted to be my ownboss, make my own money and do work that was meaningful and added value to mylife and family. My search for a new business idea beganas a newlywed and new homeowner searching to find unique home decor productsonline at an affordable price. After realizing that the Internet didn’t offer whatI was looking for, I decided to put my marketing background and passion fordecorating to good use. 


    Chateau Maison Interiors sell french country and urban vintage home decor accessories such as pillows, candle holders, wall art, frames, storage and organizational pieces and home garden items. The items sold in this store are hand picked to reflect themodern vintage and cottage chic pieces that you would find in a French countryhome. I hope that my keen eye for decorating in these product choices will help make your house a home.

    They have a beautiful site full of so many gorgeous French accessories! I have fallen in love with several pieces that are now on my wish list!
     Here are two of my favorite items:


    I hope you all have a marvelous Friday!


Post Title

→

Easy Hot Fudge Sauce


Post URL

→

https://day-lab-diy.blogspot.com/2011/09/easy-hot-fudge-sauce.html


Visit Animation Wallpaper Blogs for Daily Updated Wedding Dresses Collection
Wednesday, June 1, 2011

Easy S'more Cookies


    Well, I have coerced another sibling of mine to do a guest post for me seeing how thanks to poor little Miss Lola, blogging is on the back-burner for now. Although, like Jason she is rather sarcastic, her post is a bit more practical and has some beautiful photographs that she took. I am not sure which I am lusting after more: the cookies or the gorgeous bouquet of lilacs! I adore lilacs. I feel like I can smell these ones right through my computer screen. Anyway, here she is: (and hmmm.....I've got a feeling she is about to ask me a big favor, seeing how she starts off by buttering me up and calling me gifted - haha!)

    Falling between Jenni, the gifted sister, and Jason, the golden son, there happen to be two of us who are merely mortal. We didn't go to the #1 business school in the country, play Division I sports (kind of), or launch our own brands. May I introduce myself as the younger of these two underachieving sisters: Hi, I'm Jamie.

    When we were growing up and Jenni was busy dreaming about being the next Martha Stewart, I occupied my time playing MASH and sending valentines to Grant Hill. Now that I am an aged woman of twenty-four and about to celebrate my second anniversary (no, not to Grant Hill), I spend my time painting second-hand furniture, working on the house that my husband and I have been building for an eternity, and trying out vegetarian concoctions in the kitchen (much to my carnivorous husband's ongoing dismay). The word "career" sends a chill down my spine and I break my own personal records for days in a row without leaving the house on a frighteningly regular basis, particularly in the winter. If I had a gold lamp, every day would consist of hot fudge sundaes, a new Kate Morton to read, and a great deal of snuggling. (In my lamp-less reality, Kate's just not pulling her weight.) I don't excel at many things. My driving is ridiculed, my ability to have a comprehendible conversation limited, and my social skills are rudimentary at best. But I do have years of experience under my belt when it comes to one thing: chocolate. Its consumption, anyway--I apologize in advance to any serious bakers. It will probably come as no surprise to you that my skills in the kitchen are also limited. I set the oven on fire a few months ago--thank goodness we live in New England, where three feet of snow makes quick work of a flaming pan. But let this be an encouragement to those who also get hand cramps from stirring batter: even I can make these cookies with ease. So without further ado, I present the most elementary, yet highly satisfying, recipe I've ever tried:


    S'more Cookies

    Ingredients:
    - One package of Tolehouse Cookie Dough
    - 13 Marshmallows
    - 1/2 to 1 bag of Hershey's Special Dark Chocolate Bits (I use a whole bag, but you can use as much or as little on the tops of the cookies as you like.)

    Directions:
    1) Bake cookies according to instructions. (Here, you can also make chocolate chip cookies from scratch if you prefer homemade and possess the patience that I do not. If this is the case, you will need to vary the number of marshmallows and chocolate bits to suit the number of cookies your recipe makes.)

    2) Cut marshmallows in half while cookies are in oven. When the cookies are done, place marshmallow halves on top, sticky side down, and return to oven for 2 minutes.

    3)While cookies are back in, pour chocolate bits into a microwave-safe container and melt (I use a glass Pyrex measuring cup). I melt for thirty and stir, then melt for 15 and stir and repeat until they are completely melted.

    4) Remove cookies from oven, press the now-puffy marshmallows down with a finger or fork, and spoon melted dark chocolate onto the tops.

    5) Let cool, then remove to a cookie rack until completely cooled. Then, place in a container, putting wax paper between each layer so they don't stick together. (I usually keep them on the rack for a couple hours before I put them in the fridge. I'm sure they don't have to wait quite this long, but I usually leave the kitchen and forget all about them for several hours.)

    6) Remove from fridge at least 30 minutes before serving.  (It's been hot and humid this week, so I've been taking a couple out 5 or 10 minutes before I eat them, but in the winter I'd give it closer to 30).

    You can also make these with peanut butter cookies on the bottom, but in this family, the more chocolate the better, so I haven't tried them that way yet. Also, make sure to have one soon after you pour the melted chocolate on top-they are messy this way but heavenly!


    Thanks, Jamie! I can't wait to try them!

    We are headed off to the children's hospital again this morning for another appointment for Lorelei. We appreciate all of your continued prayers for her! And then hopefully we will be headed from there to the Outer Banks with my family for a much needed mini-vacation. Here is one of my favorite pictures from our trip there last year:


    I hope you all have a wonderful rest of the week.

Post Title

→

Easy S'more Cookies


Post URL

→

https://day-lab-diy.blogspot.com/2011/06/easy-s-cookies.html


Visit Animation Wallpaper Blogs for Daily Updated Wedding Dresses Collection
Tuesday, February 8, 2011

An Inexpensive, Easy Valentine's Gift with a "Sort-Of" Recipe

    Today Lillie and I made some Valentine's gifts.


    Back in either high school or college I was baking one day and mid-way through realized I was short on ingredients (sadly I still do that all of the time - just ask poor Jon about the chicken I made the other night!) and just randomly decided to start improvising and then for some reason decided to roll the batter and dip it in chocolate (I don't even remember what it was I was attempting to bake, it was so long ago, maybe peanut butter fingers?) Anyway, I devoured them and they quickly became my FAVORITE snack and soon I got my family addicted to them too. There really isn't a recipe (although I will give a general idea of how to make them below) because when I make them I just kind of dump things in as I go. One time when I was home we tried to measure everything when we made them so that we could write it down and remember for the next time but I don't really ever know what happened to that idea because somehow we still don't have it figured out. They are super easy to make (you don't even cook them) but for some reason no one else ever makes them, just every time I am home my siblings (mainly my brother) bribe me into making them. (Seeing how I am a horrible cook, it's the ONLY thing anyone is ever begging me to make - haha!)

    Anyway, for the past several years when Valentine's Day rolls around I try to make a batch and send them to my family. I don't particularly love making them because I tend to eat WAY too many of them and make myself sick (I won't even tell you how many I had today, in fact I just packaged up the boxes and got them ready to ship so that I couldn't get my hands on any more - I have no self-control! Arghhh! At least this year I can blame it on being pregnant!) Anyway, I have no idea why we all like them so much, there really isn't anything special about them - they are basically just a home-made Reese's cup. Once they are made, though, I have fun packaging them up. That's my favorite part!

    This year I decided to make a whole bunch of them and figured we would send them to all of our family, and then make some for our neighbors and for Jon to bring to the coaches and their wives/fiances and a big batch for the team. I brought in a whole pile of little boxes I had in the garage and Lillie and I started baking. Haha - oh what a delusional thought that was! I forgot that everything literally takes FOUR times longer when you have a little "helper" It took us like two hours to make one batch (it normally takes about 30 minutes or so) and the thought of making another four or five batches quickly went out the window! In fact the thought of even making one more batch once I had Lillie cleaned up (see pics below) was too much. Oh well, maybe next year. Well, actually I will have two little "helpers" next year so probably not! Maybe someday. Anyway, here is the "recipe", if you can call it that:

     Chocolate Peanut Butter Balls
    (Sadly that is what we refer to them as....so creative, I know! I thought of making a slightly better name for them for this post but figured Jason would definitely make fun of me for that.)

    For the inside:
    Butter ( 1/2 cup - or 1 stick)
    Brown Sugar (start with 3/4 cup but probably will add more)
    Peanut Butter (start with 1/2 cup but may add more)
    Vanilla (3/4 teaspoon)
    Flour (start with 1/2 cup but definitely WILL add more)

    That's it! Now, like I said there are no real measurements I go by so as long as you aren't picky about that they are super easy to make. For the batch I made today I started with one stick of butter. I popped it in the microwave until it was completely melted. Then I started adding the brown sugar. I think it probably ended up being close to a cup by the time I was done however feel free to add a more or less depending on how sweet you want it. Then add in the peanut butter. I would say we started with about a 1/2  cup but maybe used around 3/4 a cup by the time we were done but again I am not really sure. You do want it to be more peanut buttery than sugary as far as the taste goes. I generally take a little taste at this point and see. If it is too sweet I add a little more peanut butter (you don't want it to be too sweet because they are so rich once you dip them in the chocolate).  Then I added around 3/4 teaspoon of vanilla and stirred it again. And now for the last part. To start with I dumped in about 1/2 cup of flour. I stirred it all in and then just kept adding a 1/4 cup at a time until it was a nice consistency to roll into little balls.  Now roll them and place them on a cookie sheet covered in wax paper. (Make sure you put them on wax paper - it will make picking them up after they are coated in chocolate soooo much easier!)


    Now for the dipping!
    2 - 4 cups of chocolate chips

    That's it! I generally start with about a cup to a cup and a half of chocolate bits and just dump them into something that is safe for the microwave. Today I put it in for 45 seconds then took it out and stirred the chocolate chips and put it in for another 45 seconds and stirred again and it was ready to go. (You may have to keep doing it for a little bit longer depending on how your microwave works. Just don't put it in for longer than a minute at a time without stirring it or the bottom ones may burn - I've definitely had that happen before!) I coat as many as I can and then just melt more chocolate as needed. I find using something like this makes it pretty easy and I don't waste as much chocolate as I do when I use a bigger bowl.

     To coat the peanut butter balls you just drop them in one at a time and just spoon the chocolate over them. (Lillie's first two or three turned out kind of "interesting" so we switched her job to just being the "dropper" and I did the actual coating).

    As we finished dipping each one we just placed it back on the wax paper. Once they were all done we popped them in the fridge. They generally harden within an hour and then that is also where we store them.  They aren't nearly as good if you don't keep them in the fridge! Because it's pretty cold this time of year they ship just fine. I wouldn't recommend ever trying to ship them in the summer!

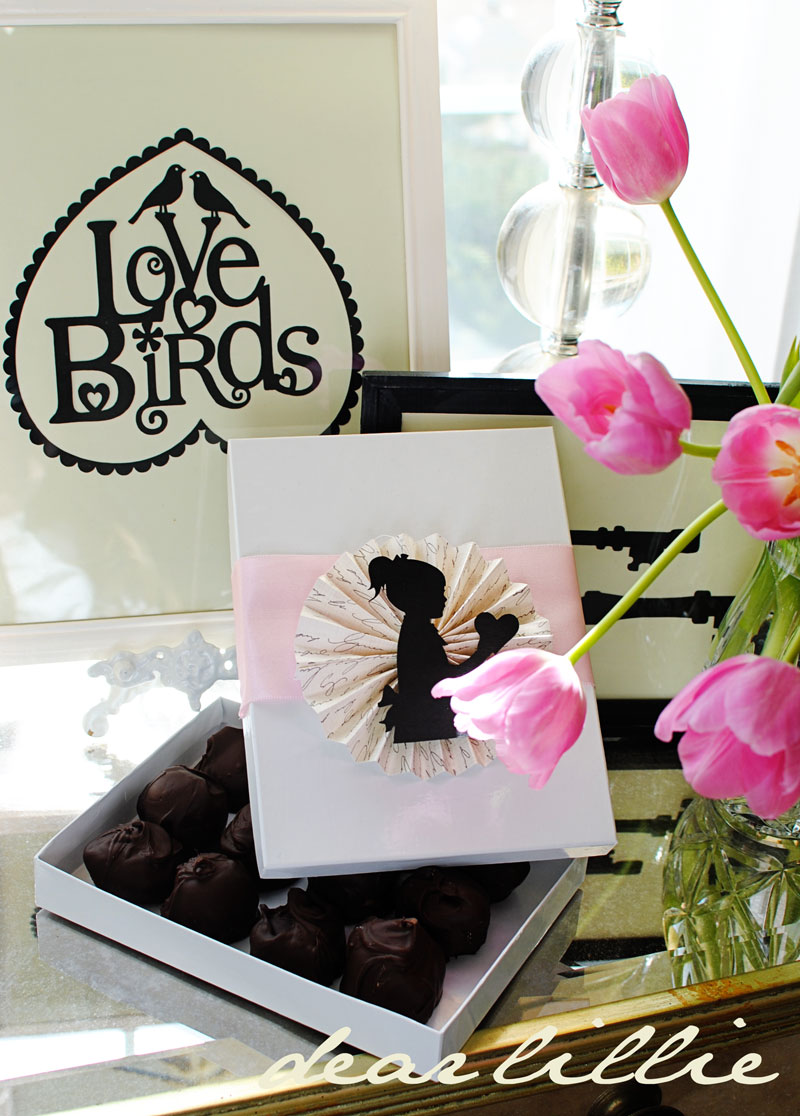
    Now for the fun part! We put some wax paper down first and then packaged them up in some little boxes we had stored in the garage.

    For the tops we just used double stick tape and taped a thick ribbon around the top of the box and then added this fun little decoration on top. In my next post I will show you how to make the little fan medallion thingy. Jon and my siblings went in together and got me a Silhouette machine for my birthday. It just came the other day and I have had so much fun with it! I used it to cut out this silhouette, but you could also just cut out a simple heart to put on top as well. 

     I figured for shipping purposes a flat design would work better so we also made a few of these. I used my new machine to cut these out as well, but you could just as easily print a simple Valentine's graphic (maybe even the Je T'aime template) in black on cream cardstock and then just back it with a piece of black cardstock. To make it really easy you could skip the oval shape and just do a square or rectangle.


    And here is Miss Lillie's version:

     And when you are all done it's time to lick the bowl! 
    (Lillie's most favorite part of baking, of course!)


     She got her jammies (yes, it was noon and we were still in our pajamas!) covered in chocolate so we had to get them in the wash and just to make you all feel better (mainly you, Woody, although I am sure by now you have given up reading this post as it contains a LOT of writing) after letting her eat all of that chocolate I did NOT let her have an actual chocolate peanut butter ball until after dinner. Instead I made her snack on a "juicy orange" (clementine).


    I will show you how to make the fan medallions in my next post (we have made a ton of them and they are hanging in our dining room and living room) and hopefully will have a Valentine's template like the Silent Night one that you can print out and will show you the rest of our Valentine's projects. My goal is to post all of that tomorrow but if not then definitely on Friday.


    I hope you all have a wonderful week!


    P.S. Linking up to Wendy's Frugal Friday!

Post Title

→

An Inexpensive, Easy Valentine's Gift with a "Sort-Of" Recipe


Post URL

→

https://day-lab-diy.blogspot.com/2011/02/inexpensive-easy-valentine-gift-with.html


Visit Animation Wallpaper Blogs for Daily Updated Wedding Dresses Collection
Thursday, June 10, 2010

Chocolate Chip Pound Cake

    Well, it has been quite an exhausting few days! We had decided to leave around 5 or so on Tuesday to head to NH for my cousin's wedding but Lillie woke up Tuesday morning with a fever of 104. Even after a nice dose of Motrin it didn't go down much so we headed to prompt care because her doctor wasn't in. After a lengthy visit there and still with a 104 temp, we discovered she was fine, which was a huge relief! Then we headed to the Verizon store (I had lost my phone last Wednesday and finally had a new one come in on Monday but, of course, it didn't work). We were there for FOREVER! Finally though, at 3:30 we returned home with a working phone for the first time in a week! I put Lillie down for her nap and had to package up six items to get sent out and then finally started packing. Needless to say we did not get out at 5. We finally left at 8:10! It was a LONG trip, but we did make it here safe and sound.

    I don't have any pics to share yet, but thought I would share one of my favorite recipes! Recipes from me will be very few and far between, because I am a horrible cook. I LOVE to bake, though (and Lillie loves to too). This is one of my favorite recipes because it is so easy and so delicous! My Aunt Patty shared it with us years and years ago and my mom, sisters and I make it on a pretty regular basis. It can be horribly addicting. Normally we make it in a regular bundt pan, but this time Lillie and I made it in a sandcastle one. My sister Jamie got me this adorable pan. It actually looks best if you make a regular lighter color pound cake, but I was craving the chocolate chip!

    Chocolate Chip Pound Cake:
    1 (18.25 oz) yellow cake mix that has pudding in the mix
    1 (3.9 oz) package chocolate instant pudding mix
    1/2 cup sugar
    3/4 cup vegetable oil
    3/4 cup water
    4 large eggs
    1 carton (8 oz) sour cream
    1 cup semi-sweet chocolate bits
    sifted powdered sugar
    Combine first three ingredients, stirring with a wire whisk to remove large lumps. Add oile and next three ingredients, stirring until smooth. Stir in chocolate bits. Pour batter into a greased and floured 12 cup bundt pan (any bundt pan should work). Bake at 350 degrees for 45 minutes to an hour. Shake pan a bit when you pull it out, to loosen edges. Cool in pan for 10 minutes. Remove from pan. Let cool for a little white longer and then sprinkle the top with powdered sugar. Enjoy!


    I am LOVING all of the quote ideas from you all! Please keep them coming! (Either scroll down or click here) and also don't forget there is still plenty of time to enter out pillow and clutch give-away!

    It is rainy here today, so we probably won't get any good photos today but I am hoping to take some of the Audrey Hepburn tutu tomorrow and will share them as soon as I do!

Post Title

→

Chocolate Chip Pound Cake


Post URL

→

https://day-lab-diy.blogspot.com/2010/06/chocolate-chip-pound-cake.html


Visit Animation Wallpaper Blogs for Daily Updated Wedding Dresses Collection

Blogroll

Popular Posts

My Blog List

Tattoos Picture Page 1 Tattoos Picture Page 2 Tattoos Picture Page 3 Tattoos Picture Page 4 Tattoos Picture Page 5 Tattoos Picture Page 6 Tattoos Picture Page 7 Tattoos Picture Page 8 Tattoos Picture Page 9 Tattoos Picture Page 10 Tattoos Picture Page 11 Tattoos Picture Page 12 Tattoos Picture Page 13 Tattoos Picture Page 14 Tattoos Picture Page 15 Tattoos Picture Page 16 Tattoos Picture Page 17 Tattoos Picture Page 18 Tattoos Picture Page 19 Tattoos Picture Page 20 Tattoos Picture Page 21 Tattoos Picture Page 22 Tattoos Picture Page 23 Tattoos Picture Page 24 Tattoos Picture Page 25 Tattoos Picture Page 26 Tattoos Picture Page 27 Tattoos Picture Page 28 Tattoos Picture Page 29 Tattoos Picture Page 30 Tattoos Picture Page 31 Tattoos Picture Page 32 Tattoos Picture Page 33 Tattoos Picture Page 34 Tattoos Picture Page 35 Tattoos Picture Page 36 Tattoos Picture Page 37 Tattoos Picture Page 38 Tattoos Picture Page 39 Tattoos Picture Page 40 Tattoos Picture Page 41 Tattoos Picture Page 42 Tattoos Picture Page 43 Tattoos Picture Page 44 Tattoos Picture Page 45 Tattoos Picture Page 46 Tattoos Picture Page 47 Tattoos Picture Page 48 Tattoos Picture Page 49 Tattoos Picture Page 50 Tattoos Picture Page 51 Tattoos Picture Page 52 Tattoos Picture Page 53 Tattoos Picture Page 54 Tattoos Picture Page 55 Tattoos Picture Page 56 Tattoos Picture Page 57 Tattoos Picture Page 58 Tattoos Picture Page 59 Tattoos Picture Page 60 Tattoos Picture Page 61 Tattoos Picture Page 62 Tattoos Picture Page 63 Tattoos Picture Page 64 Tattoos Picture Page 65 Tattoos Picture Page 66 Tattoos Picture Page 67 Tattoos Picture Page 68 Tattoos Picture Page 69 Tattoos Picture Page 70 Tattoos Picture Page 71 Tattoos Picture Page 72 Tattoos Picture Page 73 Tattoos Picture Page 74 Tattoos Picture Page 75 Tattoos Picture Page 76 Tattoos Picture Page 77 Tattoos Picture Page 78 Tattoos Picture Page 79 Tattoos Picture Page 80 Tattoos Picture Page 81 Tattoos Picture Page 82 Tattoos Picture Page 83 Tattoos Picture Page 84 Tattoos Picture Page 85 Tattoos Picture Page 86 Tattoos Picture Page 87 Tattoos Picture Page 88 Tattoos Picture Page 89 Tattoos Picture Page 90 Tattoos Picture Page 91 Tattoos Picture Page 92 Tattoos Picture Page 93 Tattoos Picture Page 94 Tattoos Picture Page 95 Tattoos Picture Page 96 Tattoos Picture Page 97 Tattoos Picture Page 98 Tattoos Picture Page 99 Tattoos Picture Page 100 Tattoos Picture Page 101 Tattoos Picture Page 102 Tattoos Picture Page 103 Tattoos Picture Page 104 Tattoos Picture Page 105 Tattoos Picture Page 106 Tattoos Picture Page 107 Tattoos Picture Page 108 Tattoos Picture Page 109 Tattoos Picture Page 110 Tattoos Picture Page 111 Tattoos Picture Page 112 Tattoos Picture Page 113 Tattoos Picture Page 114 Tattoos Picture Page 115 Tattoos Picture Page 116 Tattoos Picture Page 117 Tattoos Picture Page 118 Tattoos Picture Page 119 Tattoos Picture Page 120
Luxury Villa and Home Page 1 Luxury Villa and Home Page 2 Luxury Villa and Home Page 3 Luxury Villa and Home Page 4 Luxury Villa and Home Page 5 Luxury Villa and Home Page 6 Luxury Villa and Home Page 7 Luxury Villa and Home Page 8 Luxury Villa and Home Page 9 Luxury Villa and Home Page 10 Luxury Villa and Home Page 11 Luxury Villa and Home Page 12 Luxury Villa and Home Page 13 Luxury Villa and Home Page 14 Luxury Villa and Home Page 15 Luxury Villa and Home Page 16 Luxury Villa and Home Page 17 Luxury Villa and Home Page 18 Luxury Villa and Home Page 19 Luxury Villa and Home Page 20 Luxury Villa and Home Page 21 Luxury Villa and Home Page 22 Luxury Villa and Home Page 23 Luxury Villa and Home Page 24 Luxury Villa and Home Page 25 Luxury Villa and Home Page 26 Luxury Villa and Home Page 27 Luxury Villa and Home Page 28 Luxury Villa and Home Page 29 Luxury Villa and Home Page 30 Luxury Villa and Home Page 31 Luxury Villa and Home Page 32 Luxury Villa and Home Page 33 Luxury Villa and Home Page 34 Luxury Villa and Home Page 35 Luxury Villa and Home Page 36 Luxury Villa and Home Page 37 Luxury Villa and Home Page 38 Luxury Villa and Home Page 39 Luxury Villa and Home Page 40 Luxury Villa and Home Page 41 Luxury Villa and Home Page 42 Luxury Villa and Home Page 43 Luxury Villa and Home Page 44 Luxury Villa and Home Page 45 Luxury Villa and Home Page 46 Luxury Villa and Home Page 47 Luxury Villa and Home Page 48 Luxury Villa and Home Page 49 Luxury Villa and Home Page 50 Luxury Villa and Home Page 51 Luxury Villa and Home Page 52 Luxury Villa and Home Page 53 Luxury Villa and Home Page 54 Luxury Villa and Home Page 55 Luxury Villa and Home Page 56 Luxury Villa and Home Page 57 Luxury Villa and Home Page 58 Luxury Villa and Home Page 59 Luxury Villa and Home Page 60 Luxury Villa and Home Page 61 Luxury Villa and Home Page 62 Luxury Villa and Home Page 63 Luxury Villa and Home Page 64 Luxury Villa and Home Page 65 Luxury Villa and Home Page 66 Luxury Villa and Home Page 67 Luxury Villa and Home Page 68 Luxury Villa and Home Page 69 Luxury Villa and Home Page 70 Luxury Villa and Home Page 71 Luxury Villa and Home Page 72 Luxury Villa and Home Page 73 Luxury Villa and Home Page 74 Luxury Villa and Home Page 75 Luxury Villa and Home Page 76 Luxury Villa and Home Page 77 Luxury Villa and Home Page 78 Luxury Villa and Home Page 79 Luxury Villa and Home Page 80 Luxury Villa and Home Page 81 Luxury Villa and Home Page 82 Luxury Villa and Home Page 83 Luxury Villa and Home Page 84 Luxury Villa and Home Page 85 Luxury Villa and Home Page 86 Luxury Villa and Home Page 87 Luxury Villa and Home Page 88 Luxury Villa and Home Page 89 Luxury Villa and Home Page 90 Luxury Villa and Home Page 91 Luxury Villa and Home Page 92 Luxury Villa and Home Page 93 Luxury Villa and Home Page 94 Luxury Villa and Home Page 95 Luxury Villa and Home Page 96 Luxury Villa and Home Page 97 Luxury Villa and Home Page 98 Luxury Villa and Home Page 99
Famous People Page 1 Famous People Page 2 Famous People Page 3 Famous People Page 4 Famous People Page 5 Famous People Page 6 Famous People Page 7 Famous People Page 8 Famous People Page 9 Famous People Page 10 Famous People Page 11 Famous People Page 12 Famous People Page 13 Famous People Page 14 Famous People Page 15 Famous People Page 16 Famous People Page 17 Famous People Page 18 Famous People Page 19 Famous People Page 20 Famous People Page 21 Famous People Page 22 Famous People Page 23 Famous People Page 24 Famous People Page 25 Famous People Page 26 Famous People Page 27 Famous People Page 28 Famous People Page 29 Famous People Page 30 Famous People Page 31 Famous People Page 32 Famous People Page 33 Famous People Page 34 Famous People Page 35 Famous People Page 36 Famous People Page 37 Famous People Page 38 Famous People Page 39 Famous People Page 40 Famous People Page 41 Famous People Page 42 Famous People Page 43 Famous People Page 44 Famous People Page 45 Famous People Page 46 Famous People Page 47 Famous People Page 48 Famous People Page 49 Famous People Page 50 Famous People Page 51 Famous People Page 52 Famous People Page 53 Famous People Page 54 Famous People Page 55 Famous People Page 56 Famous People Page 57 Famous People Page 58 Famous People Page 59 Famous People Page 60 Famous People Page 61 Famous People Page 62 Famous People Page 63 Famous People Page 64 Famous People Page 65 Famous People Page 66 Famous People Page 67 Famous People Page 68 Famous People Page 69 Famous People Page 70 Famous People Page 71 Famous People Page 72 Famous People Page 73 Famous People Page 74 Famous People Page 75 Famous People Page 76 Famous People Page 77 Famous People Page 78 Famous People Page 79 Famous People Page 80 Famous People Page 81 Famous People Page 82 Famous People Page 83 Famous People Page 84 Famous People Page 85 Famous People Page 86 Famous People Page 87 Famous People Page 88 Famous People Page 89 Famous People Page 90 Famous People Page 91 Famous People Page 92 Famous People Page 93 Famous People Page 94 Famous People Page 95 Famous People Page 96 Famous People Page 97 Famous People Page 98 Famous People Page 99 Famous People Page 100 Famous People Page 101 Famous People Page 102 Famous People Page 103 Famous People Page 104 Famous People Page 105 Famous People Page 106 Famous People Page 107 Famous People Page 108 Famous People Page 109 Famous People Page 110 Famous People Page 111 Famous People Page 112 Famous People Page 113 Famous People Page 114 Famous People Page 115 Famous People Page 116 Famous People Page 117 Famous People Page 118 Famous People Page 119 Famous People Page 120

Recent Posts

Pages